Pages

Saturday, December 26, 2009

Fast Skin Shading (ShaderX 7)

I bought ShaderX 7 a couple of months back, but only recently then i found the time to read through it and one of the articles that got my attention was chapter 2.4 Fast Skin Shading by John Hable, George Borshukov, and Jim Hejl. In the chapter, they proposed a lightweight skin shading technique based off the one that was used in the NVIDIA human head demo. One of the major differences was replacing the expensive 5 pass gaussian blurs (14 taps per pass) with a single blur pass (with 12 uniquely positioned and weighted taps). This change significantly improves the performance and in my opinion makes this technique actually usable in current games. Albeit the quality is still not as great as the original.

In my implementation, i have replaced the usual phong specular with a more physically accurate kelemen/szirmay-kalos specular model as described here. Shadows are rendered into the light map and blurred together, softening the jagged edges. SSAO is then added in the final pass to give more depth to the final render.

There is still some improvements that could be done, like implementing the stretch correction map to prevent over blurring around the ears and having a better dilation implementation. All in all, I am pretty satisfied with the result achieved in terms of both quality and performance.

Time for some screenshots!
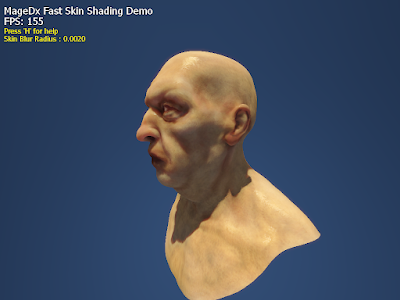

Hmm...mean looking


Bald and shiny!


Nice detail around and in the nostrils...

Monday, September 21, 2009

Weekend Coding: Anisotropic Filtering

After a few weeks of inactivity, i finally took some time off over the weekend to implement anisotropic filtering (a long overdue feature) to the engine. Anisotropic filtering has been used in games for a pretty decent amount of time, it is not groundbreaking technology however it is still a nice to have feature (or rather a need to have feature for high quality 3D rendering) to include in a 3D engine. For those wondering what is anisotropic filtering here is a short description taken from wikipedia.

In 3D computer graphics, anisotropic filtering (abbreviated AF) is a method of enhancing the image quality of textures on surfaces that are at oblique viewing angles with respect to the camera where the projection of the texture (not the polygon or other primitive on which it is rendered) appears to be non-orthogonal.

Or in layman's term, it makes the graphics prettier :)

I have included a few screenshots below to show the quality improvement by applying anisotropic filtering. Trilinear and anisotropic filtering 16x was used for figure 1 and 2 respectively. Notice how the ground, brick and roof textures looks much sharper in figure 2 than in figure 1.

Figure 1: Trilinear filtering

Figure 2: Anisotropic filtering 16x

Finally to end this post, i have included another screenshot below showing the comparison between the various levels of anisotropic filtering. Cheers!

Comparison of various level of filtering mode. From left to right: Trilinear, Anisotropic 2x, Anisotropic 4x, Anisotropic 8x, Anisotropic 16x

Monday, July 20, 2009

Real-Time Water Rendering with Reflection and Refraction Demo


After a week of preparation, i am proud to present my first public tech demo "Real-Time Water Rendering with Reflection and Refraction". Built using the new and improved MageDx 3D graphics engine, the demo showcases the following graphical features:
  • Water rendering with reflection and refraction (obviously)
  • Atmospheric scattering
  • Parallel-split shadow mapping
  • High dynamic range lighting (using the Phong shading model)
  • Depth of field
  • Screen space motion blur
  • Screen space ambient occlusion
There are a couple of features that did not make it in due to time constraints (example: god rays, sub-surface scattering), i guess i just have to cover them in future demos then.

Download link: MageDx Water Demo (8.79MB)

[Controls]

W - Move forward
S - Move backward
A - Move Left
D - Move Right
Mouse - Look around
F11 - Take screenshot
1 - Toggles shadows on/off
2 - Toggles depth of field on/off
3 - Toggles screen space ambient occlusion on/off
4 - Toggles motion blur on/off
5 - Toggles day-night cycle on/off

NOTE : The demo requires a graphics card that supports shader model 3.0 and should run fine on both ATI and NVIDIA cards.
If you face any difficulty running the demo, make sure you have the latest DirectX runtime and video card drivers installed.
For those unable to run the demo, i have uploaded a short video footage below. Enjoy!


Monday, July 13, 2009

Bought a Nvidia 260GTX :) / Atmospheric scattering

Bought a Nvidia 260GTX :)
My old graphics card (a Nvidia 8800gts 320) died recently while trying to do a video capture. Poor card started to chew out weird colored pixels and never recovered. Since the warranty for the card has expired a long time ago, I decided to purchase a new one. The revised Nvidia 260GTX with its 216 shader cores, low power consumption on idle (when compared to ATI's equivalent offer the HD4870) and lower temperature on load are the deciding factors I bought one eventually. After testing out the card in a couple of games, I must say I am very impressed with the performance delivered. In fallout 3, I was able to max out the graphics settings at screen resolution of 1680x1050 and the game was still fully playable. In MageDx tech demo II, it doubled the frame rate I got with the 8800 gts 320, going from an average 50~60fps to an impressive 110~120fps. I would recommend this card to anyone looking for an upgrade but beware of the size of the card, measuring at 10.5 inches (26.7cm) long, this card is definitely not for those who has a small casing.

Atmospheric scattering
Over the weekend, I have added atmospheric scattering to MageDx. My implementation is based on the paper "Rendering outdoor light scattering in real time by Hoffman, N., Preetham, A.J.". Getting the sky to display correctly was pretty tricky, it took me quite a bit of time tweaking the rayleigh/mie parameters to get nice sky blue color shown in the screenshot below.

To see the full effect of atmospheric scattering, i recommend looking at the video i have uploaded below. The video shows a simple day-night cycle simulation complete with dynamic lighting and shadowing.


Thats it for now! Back to more coding...

Monday, June 29, 2009

MageDx Level Editor

Prior to MageDx Tech Demo II, all the levels for my tech demos were build using Autodesk 3ds Max. Initially, this approach worked fine for small scenes, but as i started to create larger scenes, frequent editing and exporting of levels became a big time waster. There was also the need to have 3ds Max installed on the system in order to make any changes. Obviously, a better of way of doing things had to be found. After a few months of work, i am proud to introduce the MageDx level editor.

A screenshot of MageDx level editor in action

Build upon the MageDx 3D graphics engine and utilizing wxWidgets for the GUI, the MageDx level editor is a WYSIWYG (What You See Is What You Get) editor that allows for fast and easy creation, manipulation and edition of objects in a level.

Notable features of the editor includes:

WYSIWYG
As mentioned previously, everything (including lighting, shadowing and other graphical effects) you see in the editor will be what you will be getting in the final game. This greatly improves work flow as there is no longer any need to toggle between 3ds Max and the final game for visual verification of the level.

Real-time preview system
The WYSIWYG portion takes care of the visual part. But how about game play? This is where the real-time preview system kicks in. This system allows users to play their level straight from the editor itself. This allows for fast prototyping and testing of game play, a major time saver for game/level designers.

Component based entity system
While not an editor feature, by exposing the functionality to add/remove components in the level editor, users are able to create customized objects with unique properties, all without touching a single piece of source code.

The development of the level editor helped to cut down the time it took to develop MageDx Tech Demo II substantially, which is pretty important since i am doing all this as a hobby on my free time. By using the editor, future demos (if any) should be done much quickly.

Videos will be posted on a later date to showcase some of the functionality of the MageDx level editor.

Thursday, May 21, 2009

MageDx Tech Demo II

After 2 months of midnight coding (and constant hair pulling), i am proud to present MageDx tech demo II!!! Graphically, tech demo II is pretty much the same as tech demo I with the few exceptions listed below
  • unit cube clipping has been implemented on parallel-spiit shadow mapping to improve the quality of shadow rendering
  • occlusion radius for screen space ambient occlusion has been fine-tuned for the scene
  • reduce bleeding effect on the boundaries for depth of field
  • improved occlusion culling
  • better looking 3D models with proper specular maps :)
New to MageDx is the integration of PhysX physics engine by NVIDIA. The integration took about a week and was pretty much easy and painless, though it took about another week to optimize it fully for the engine. This makes for some interesting physics simulations which will be shown later in the videos below.

Also new to MageDx is the asset converter which is conveniently named MageDx asset converter (MDAC). Basically the asset converter converts an Autodesk FBX file to an internal file format that can used by the engine to load in 3D models. It also performs vertex cache optimizations on the meshes using Tootle provided by ATI/AMD.

The most notable feature (or in this case tool) that took most of my development time was the MageDx WYSIWYG level editor. The development of the editor allows for fast and easy manipulating and editing of objects in a level and was used to create the level seen in tech demo II. More information on the editor however will come in a later post (as there is quite a significant amount of stuff to talk about and i do not want to lengthen this post any further).

That is it! Time for videos and screenshots!

P.S. The hello kitty box is an insider joke =P


Thursday, March 12, 2009

MageDx Tech Demo

After almost 6 months of silence...finally an update!
Over the past 3 weeks, i have been actively working on MageDx (For those wondering what MageDx is, it is basically a 3D rendering engine that i have been continuously working on during my free time). However, the code has not been maintained for quite some time and i am basically rewriting almost the entire engine again. I must say i am pretty satisfied with the result given the short period of development time.

So far i have the following features implemented on the engine side:
  • Abstraction of graphics renderer
  • Transparent shader data binding
  • Post processing effect system
and on the graphics side:
  • High dynamic range lighting with eye adaptation
  • Phong shader with support up to 4* per-pixel attenuated lights *(extendable)
  • HDR Environment lighting using convoluted diffuse maps
  • Parallel-split shadow mapping
  • Depth of field
  • Screen space ambient occlusion
  • Screen space motion blur (camera only)
  • Pre-Z pass (depth is used to rebuild world position)
Features W.I.P:
  • Vertex arrays supporting flexible vertex formats
  • New geometry format using Autodesk FBX
  • Improved material/shader system
  • Effect state manager
  • Real-time atmospheric scattering
I guess that is pretty much it for now, time for some screenshots. :)